Nick Carroll Software Professional
Checkbox
Checkbox allows you to take a photo of your task list, add checkboxes to the photo, and track the tasks that you have completed.
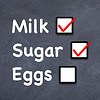
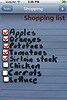
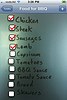
Use Checkbox to quickly capture your shopping list on your fridge, the meeting actions jotted on your notebook, or the menu of your favourite restaurant. Then turn the photo into a checklist by adding checkboxes to items in the photo that you want to track. Simply tap on the checkboxes to keep track of tasks that you have previously completed.
Instructions for using Checkbox are as follows:
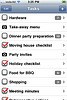
- On the Tasks screen click on the add button to create a new task list.
- On the Task Details modal screen, type in a name for your task list and tap Save or Done.
- Press the camera button to photograph your task list.
- When you have taken your photograph, you can add checkboxes by tapping the add button in the top right of the navigation bar, then tapping on the photograph to place a checkbox.
- Repeat the previous step to add more checkboxes if required.
- If you are not happy with the location of your checkbox, simply long press on a checkbox to enable edit mode. The checkboxes will begin wobbling when you have successfully entered edit mode. You can drag a wobbling checkbox to its new location, or press the delete button associated with the checkbox to remove it from the screen.
- Click the done button in the top right corner of the navigation bar to exit edit mode.
- Now that you have created your checklist, you can now tap on a checkbox to track completed task items.
- To return to the main task list screen, click on the Tasks button in the top left corner of the navigation bar.
- On the main task list screen you can edit the list by tapping on the Edit button. This allows you to delete a row, or edit the name of a task list. Tap the Done button to remove the edit options.